Wanna learn how to write functional and reactive frontend applications? It’s 2016 and things have changed a lot since GWT, jQuery and even Angular… That’s why I came up with an idea of writing a simple web game using only the “current best practices”. The code of this sample application can be found in my GitHub repo. But before I start implementing the game, I want to write about 3 “whys”.
Why JavaScript?
Frontend technologies can be really overwhelming. All things change very quickly. If you don’t want to be dependent on these changes, you need to use one thing that has survived: JavaScript. And it’s not a bad thing nowadays. ES6, the newest version of JavaScript, is very cool. It’s still not fully supported. However, we can use some transpilers to the current JavaScript version (ES5). In our case, we will write in ES6 and use Babel to transpile it to ES5 automatically.
Why React?
In React we develop independent components that can be composed and form bigger components. Components are immutable-friendly. We don’t need any “vars”/”lets” in our code. Our immutable data is created and then flows in one direction (down the component hierarchy). You may want to compare components and plain functions. Just like each function has input and output, each React component takes “state” object and “props” object and then produces “HTML” object. And when “called” with the same “state” and “props”, it will always produce the same “HTML”.
React supports declarative approach to writing user interface. And if you have ever written user interface imperatively, you will see a big difference.
But that’s not all! React applications performance is very good without even thinking about it. Your components don’t really produce HTML, but JavaScript objects. Those objects form a hierarchy that is called the virtual DOM. Virtual DOM is processed by React engine and only changed things are propagated to the real browser’s DOM. That’s why our component can be called many times in a row without affecting the performance. If it produces the same virtual DOM objects, nothing will happen in the browser. Hail to the declarative programming!
And one last thing. React is simple. It does one thing and does it well. It isn’t even a MVC framework. It’s just a V framework. It only does View. You can use whatever you want for model and whatever you want to control the flow of the data. And if we can choose, we always choose streams to control the flow of the data!
Why Streams?
When developing web applications, we need to deal with many different events flying around. User pressed something, new data came from the outside, timer went off and so on. Classic approach to this “event spaghetti” is to use callbacks. We don’t like callbacks because they tend to form “callback hells”. Nobody likes any kind of hell.
In order to achieve sanity, we need to stop focusing on individual events and start thinking about streams of events. When the smallest notion we have is a stream, we can declaratively define what happens when something appears in this stream. We can transform our streams using map & filter functions. We can combine our streams using merge & combine functions.
Enough! Enter Snake!
Let’s create a web Snake game. This won’t take long, I promise. About 100 lines of code and we are done! If you want to follow the steps that I am describing here, please checkout the the snake project, remove the Vector.jsx, Board.jsx and SnakeGame.jsx files and develop the game while you are reading!
Vector
In order to do anything productive, we need to create a Vector class which will hold our 2D positions and sizes.
// Vector.js

export default class Vector {
  constructor(x, y) {
    this.x = x
    this.y = y
  }

  equals(p) {
    return this.x === p.x && this.y === p.y
  }

  add(p) {
    return new Vector(this.x + p.x, this.y + p.y)
  }

  static random(size) {
    return new Vector(
      Math.floor(Math.random() * size.x),
      Math.floor(Math.random() * size.y)
    )
  }

  static rotateRight(pos) {
    return new Vector(-pos.y, pos.x)
  }

  static rotateLeft(pos) {
    return new Vector(pos.y, -pos.x)
  }
}
Board component
Now we will create our first React component, which will be called… Board!
// Board.jsx

export default class Board extends React.Component {
  render() {
  return <h1>this is board {this.props.size.x}
              x {this.props.size.y}</h1>
  }
}
and main.jsx which will bootstrap our app:
// main.jsx

React.render(<Board size={new Vector(20, 20)} />,
             document.getElementById("app"))
Let’s run npm start and see that right now the browser displays:
This is board 20 x 20
Not the coolest thing, but let’s see what’s happening inside. main.jsx is an entry point to the application. It defines the root React component that will contain all other components and will be rendered inside our empty DOM element called “app” which is defined inside index.html file. The Board component gets one property called size which is a Vector(20, 20). That means that our board will have 20 rows and 20 columns.
To render the Board, React engine calls render function. It has access to the properties that are passed to the component from the “outside world”. For now, it just puts them inside h1 object (which is then rendered in the browser as h1 HTML tag).
Let’s make our board fancier. We will use Flexbox to generate a grid and each cell will have one of three colors: grey if empty, green if snake and red if fruit. These are our styles:
/* style.css */

.board {
  display: flex;
  flex-direction: column;
}

.row {
  display: flex;
  flex-direction: row;
  flex-wrap: nowrap;
  justify-content: flex-start;
}

.cell {
  width: 35px;
  height: 35px;
  background-color: #eeeeee;
}

.snake {
  background-color: #807920;
}

.fruit {
  background-color: #ff5605;
}
As you see, thanks to Flexbox we are able to just define some divs and the rest will be taken care of by the browser. Let’s see how!
// Board.jsx

export default class Board extends Component {
  static propTypes = {
    size: PropTypes.instanceOf(Vector).isRequired,
    snakePositions: PropTypes.arrayOf(Vector).isRequired,
    fruitPosition: PropTypes.instanceOf(Vector).isRequired
  }

  render() {
    const {size, snakePositions, fruitPosition} = this.props
    const rows = _.range(size.y).map(y => {
      const cells = _.range(size.x).map(x => {
        const pos = new Vector(x, y)
        const maybeSnakeStyle = {
          [style.snake]:snakePositions.find(x=>x.equals(pos))
        }
        const maybeFruitStyle = {
          [style.fruit]: fruitPosition.equals(pos)
        }
        return
        <div key={x}
          className={ classNames(style.cell,
                                 maybeSnakeStyle,
                                 maybeFruitStyle) }
         />
      })
      return <div key={y} className={style.row}>{cells}</div>
    })

    return <div className={style.board}>{rows}</div>
  }
}
There are just 2 things going on here. The first one is called propTypes. The properties that are passed to our component (like size) can be “type-checked” by React. Here, we are saying that size is a Vector, snakePositions is an array of Vectors, and fruitPosition is another Vector. All of them are required. If parent component doesn’t pass any of them or passes an object with a wrong type, React will show us a warning.
In the new render function we just generate a div hierarchy and use classnames lib to use a proper style for each cell.
That’s it! We have our static board, which has a very nice API (3 properties that must be passed). Now we will use it in our second React component.
SnakeGame component
SnakeGame component will define our game logic and will delegate drawing to its child component: Board. Let’s first define all props and our render function:
export default class SnakeGame extends Component {
  static propTypes = {
    boardSize: PropTypes.instanceOf(Vector).isRequired
  }

  static defaultProps = {
    initialSnakePosition: new Vector(0, 0),
    initialSnakeDirection: new Vector(0, 1),
    initialSnakeLength: 3
  }

  state = {
    snakePositions: [],
    fruitPosition: Vector.random(this.props.boardSize),
    score: 0
  }

  // ... (see Snake logic using streams section)

  render() {
    return (
      <div className={style.game}>
        <div className={style.log}>
          Score: {this.state.score}
        </div>
        <Board size={this.props.boardSize}
               snakePositions={this.state.snakePositions}
               fruitPosition={this.state.fruitPosition}/>
      </div>
    )
  }
}
There is one new thing here: state. You can treat state as internal props. They behave similarly: if state or props change, the render function is called. The only difference is that props are passed from the outside and state can only be set inside the component.
There are 3 state values managed by the component: snakePositions, fruitPosition and score. We are using them inside our render function, which uses our Board component to render the current board. Each time we change one of the state values, render function is called which in turn calls Board’s render function.
We defined four props: boardSize, which must be defined, and 3 initial game properties, which have default values (they can also be set from the outside just like boardSize).
Snake logic using streams
Let’s define our first streams! We will use Bacon.js as our streams library, but any other streams library would suffice. Their APIs are also very similar so learning one API is often enough. Each stream operator that I am going to introduce will have a link to a wonderful RxMarbles website where you can interactively learn how a particular operator works.
export default class SnakeGame extends Component {
  // ...

  inputStreams() {
    const ticks = Bacon.interval(100)
    const keys = Bacon.fromEvent(document.body, "keyup")
                      .map(".keyCode")
    const lefts = keys.filter(key => key === 37)
    const rights = keys.filter(key => key === 39)
    return { ticks, lefts, rights }
    }

  // ...
}
We created 4 streams:
ticksis a stream that outputs an empty object each 100ms,keysis a stream that outputs aKeyboardEventobject each time user presses a key,leftsis a stream that outputs aKeyboardEventobject each time user presses the left arrow key (code = 37),rightsis a stream that outputs aKeyboardEventobject each time user presses the right arrow key (code = 39).
It’s worth noting that both lefts and rights streams are build on top the same stream (keys). We used filter operator.
Let’s use the streams we’ve just created to do some magic.
export default class SnakeGame extends Component {
// ...
snakeHeadPositions({ ticks, lefts, rights }) {
const leftRotations =
lefts.map(() => Vector.rotateLeft)
const rightRotations =
rights.map(() => Vector.rotateRight)
const actions =
leftRotations.merge(rightRotations)
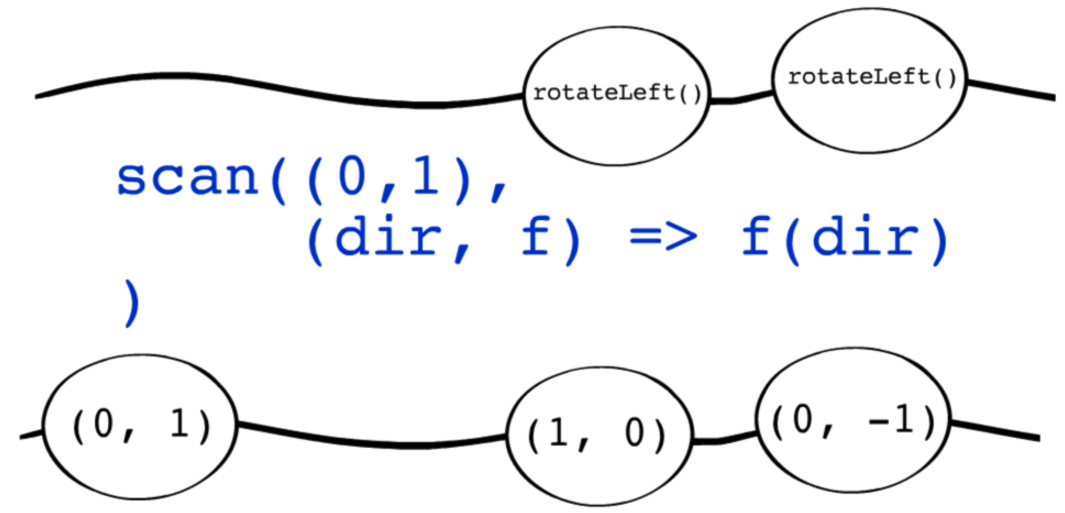
const directions = actions.scan(
this.props.initialSnakeDirection,
(dir, f) => f(dir))
return directions
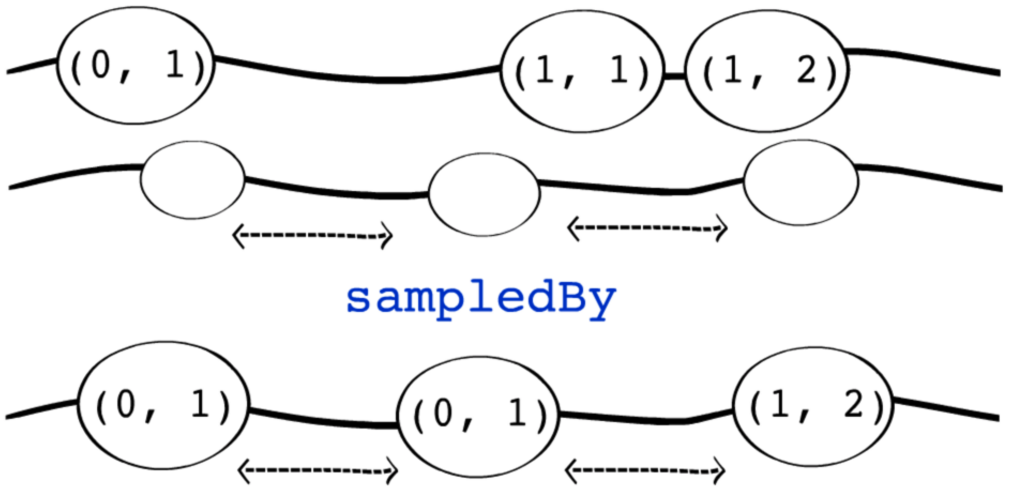
.sampledBy(ticks)
.scan(this.props.initialSnakePosition,
(pos, dir) => pos.add(dir)
.mod(this.props.boardSize))
}
// ...
}
We created 3 additional streams using two stream operators: map and merge:
leftRotationsis a stream of functions; each time user presses the left arrow key, this stream outputs arotateLeftfunction (yes, function),rightRotationsis a stream of functions; each time user presses the right arrow key, this stream outputs arotateRightfunction,actionsis a stream that outputs values from bothleftRotationsandrightRotations; each time user wants to change direction of the snake, this stream outputs a function that we need to apply to a current direction to get a new one.
directions stream is more involved. It uses the scan operator, which lets us accumulate values. In this case we are accumulating actions stream values into a current snake direction starting with a value defined in props. When a new value appears in actions stream it gets accumulated using function passed as scan’s second parameter. Each time user wants to change the direction (by pressing left or right arrow key) this stream outputs a new direction.
snakeHeadPositions function returns a stream of… well, positions of snake’s head. This stream is created using two operators: scan and sampledBy. directions stream is sampled using ticks stream, so each time there is an object in ticks, the returned stream outputs the last value from directions stream. Then the resulting stream is piped through scan operator, which accumulates directions into a position and outputs it as snake’s head. The returned stream outputs a new position each time there is a new object in ticks (effectively every 100ms).
Eating and scoring
Now we need to connect all the dots and add eating and scoring logic using the streams we have already defined. Please pay attention how much reusability we have here. We are building new functionalities using already defined streams.
export default class SnakeGame extends Component {
  // ...

  componentDidMount() {
    const snakeHeadPositions =
      this.snakeHeadPositions(this.inputStreams())
    const snakes = snakeHeadPositions.scan([],
      (snake, head) => {
        const biggerSnake = _.union(snake, [head])
        const validSnake = _.last(biggerSnake, this.props.initialSnakeLength + this.state.score)
        return validSnake
      })
    snakes.onValue(snake => this.setState({ snakePositions: snake }))

    const fruitEatenEvents = snakeHeadPositions.filter(head => head.equals(this.state.fruitPosition))
    fruitEatenEvents.onValue(() => this.setState({ score: this.state.score + 1 }))
    fruitEatenEvents.map(() => Vector.random(this.props.boardSize))
                    .onValue(fruit => this.setState({ fruitPosition: fruit }))
  }

  // ...
}
Let’s dive into details. The code above makes our snake bigger by using scan operator again. It accumulates values from snakeHeadPositions into an array of last initialSnakeLength + score elements. This array is then passed to our Board component and rendered.
snakeHeadPositions stream can also be reused as a building block to implement “eating a fruit functionality”. We need to use filter operator to create a new stream called fruitEatenEvents. An element appears in this stream only when head of the snake is exactly on fruit’s position. We can then map each value from this stream into random position and send it to our Board component. Its render function will be called and new fruit will be displayed. It will happen each time snake eats an old fruit.
fruitEatenEvents stream can also be reused to implement “scoring functionality”. Each time there is a value in this stream, we need to increment the score.
That’s it!
We have just implemented basic snake game functionality using reactive approach!
Resources
- The version of the code from the time this post was written - just checkout and start coding. Together with this post you should be able to create a simple Snake game,
- The current working version of the code - if you just want to review the code I created and how it evolves over time (after this post is published), checkout this repository and run it with
npm start. - RxMarbles - learn stream operators interactively!
- Building Snake using Streams - slides from my step-by-step tutorial talk (lots of additional visuals)